")
When collecting crawling beetles, we can use everything that has already been mentioned in the previous chapter "Basic collection methods and tools". In addition, we have a number of more or less specialised tools adapted for collecting crawling beetles.
Tools for active collection methods
Sweep net
 A widely used tool in collections is the sweep net or sweeper. It consists of a net made of monofilament (similar to a classic butterfly net), protected by a sleeve of stronger material such as dederon. The diameter of the dip net is usually in the range of 30-65 cm and its length is 1.7-2 times the diameter (up to 2.4 times in the case of extended versions). The frames of dip nets are usually rigid or foldable and are made of steel tubes or, as a lightweight version, of duralumin. The bars for these nets can be either fixed length or foldable, most often telescopic. They are available in lengths from 50 cm to 5 m. The longest ones are designed for sweeping in tree branches. Folding poles are usually made of laminate or duralumin.
 The softening net is most often used to soften lower plants, shrubs or weaker branches of young trees. A fly net usually catches species living on the stems, leaves and flowers of plants. It is necessary to move the sweep net constantly, preferably by tracing the shape of a lying figure eight. This is the only way to ensure that the insects caught in the net do not fly away again. It can also be used to immediately and quickly trap larger branches. When we are netting, we slide the net under the branch, shake the branch quickly and immediately start to use the net to make a figure of eight. When shearing, be careful not to unnecessarily damage the flowers of the plants and avoid contact with the spines that some plants are equipped with. After shearing, fold the net over the edge of the frame to prevent insects from escaping from the net before preparing to process its contents. Either carefully transfer the contents of the net into a prepared larger polythene bag, or use an exhaustor to catch them, or place part of the net with the captured specimen directly into a prepared death net (see picture).
| Video guide: Demonstration of working with the sweep net. |
| Video guide: Differences between working with entomological net and a sweep net |


Beating Tray

 Another very useful tool for the entomologist is the beating tray or beating device. This consists of a white cloth of various sizes and shapes, which is slipped under the branches of the tree, after which the branch is struck several times with a wooden or rubber mallet or stick, while constantly shaking the vault. The insects instinctively let go and fall onto the canvas from where they are collected. Three types of trap are most common:
- umbrella, made of a modified umbrella structure on which a white canvas is sewn
- net, looking like a sweep with a large diameter frame and a very shallow canvas bag; the handle of the bucket points towards the centre of the frame
- the so-called American type of vault, which consists of a square- or rectangular-shaped canvas, the corners of which are fixed by bars joined in a cross
The common feature of all types of vaults is their size. The diameter or side in the case of the American type of vault is at least 1 metre. Each of these types has its advantages and disadvantages. I personally use the American type of vault because of its huge footprint. The disadvantages of this type are less dexterous handling (just because of its size) and sensitivity to any strong gust of wind.
The beating tray is a very useful tool for collecting beetles on larger plants such as shrubs and trees. It is also suitable for use on thorny plants although great care must be taken here to avoid tearing the beating tray. A beating tray trap will catch species living on the stems, leaves, flowers and bark of trees and shrubs. We are careful not to destroy trees and shrubs when we are beating. We apply short, quick strokes designed to shake the branch, not break it. Two to three successive blows are quite sufficient to release insects that react late. Insects that fall into the beating tray are immediately picked out with tweezers and exhausted before they recover and fly away. Beating should be done early in the morning, at lower temperatures or under cloudy skies when insects are not as active. On the other hand, in full sun and high temperatures a large part of the insects will not fall into the beating tray at all, but will fly away during the fall.
| Video guide: Beating Tray |
With sweep net and beating tray methods, we can also extract a lot of material from plants, such as fragments of stems, flowers or twigs. We can either take the material we obtain in this way by hand or process it further in a machine called a photoeclector (see next paragraphs). We can use sweeping and beating methods throughout the growing season.
Sifting

 Beetles hiding in forest litter, tree debris, moss, lichens, peeled bark, fallen leaves, dry and melting grass, tree and other fungi or other material can be easily found with the help of another tool, which is a sifter. It consists of two fixed frames, placed one above the other, and a canvas sleeve, about 1 - 1.5 metres long. The frames are between 30 and 50 cm in diameter and are spaced 30 to 50 cm apart. Both frames are fitted with handles which are offset by 90° from each other. In addition, the lower frame is fitted with a sieve with a mesh diameter of approximately 1 cm. When sieving finer material, a finer sieve with meshes corresponding to the material to be sieved (usually approx. 5 mm) can be placed on top of this basic sieve. The canvas sleeve, into which both frames are sewn, is finished with a tight twine.
When sieving, the sieving is carried out by using a trowel or gloved hands to push the sieved material between the two frames so that the space is about half filled. Then, using the lower handle, sift the material in a circular motion so that it spins on the sieve. It is sometimes advisable to rotate the material in the other plane, i.e. by pitching it over, in the same way as you would rotate an omelette in a frying pan. When the material is sufficiently sieved, bring the two frames together and discard the excess material. When the bottom of the sifter is full enough, pour the material into the prepared bags. If the sieved material is to be processed in a short time, plastic bags will do. However, when storing sieved material for later processing, we prefer to use canvas bags to minimise the risk of mould spreading. However, we do not delay the processing of the silage for too long (no longer than 24 hours). The sieving method can be used throughout the year.
| Video guide: Sifting |

For some types of material (e.g. wet sand on the shore), sieving can be carried out using sieves with different mesh sizes. Such sieves can be purchased either in specialised entomological stores or laboratory supplies, or they can be replaced at a much lower price by sieves available in fishing supplies (sieves with meshes of 3 -6 mm) or beekeeping supplies (sieves with meshes of 1 to 3 mm). These sieves can also be used to pre-separate the sieve from the sifter into individual fractions.


The sieve is preferably processed immediately after returning from the excursion in one of the following ways:
- manual sieving
- using a xeroeclector
- using a photoeclector
- using a thermoeclector
Manual seeding is done by pouring a small sample of the seeding into a white dish or onto a white screen and allowing the heat of the room to work. After some time, movement in the seepage is noted. Select individual species with tweezers or an extractor. When using the exhaustor, be careful not to inhale the dust that is in the millet. Even with the most precise work, we are not able to extract all the insects trapped in the moss using this method. For better selection we must use one of the many types of eclectors or, better still, a combination of them. On the other hand, hand picking is the least costly of all the techniques for processing sieves.
 When using a xeroeclector, we take advantage of the tendency of insects to stay in slightly moist environments. A typical xeroeclector consists of a frame on which mesh containers are hung. Into these containers, the mildew is dumped. The entire frame is surrounded by a sleeve of canvas or monofilament. The sleeve is closed at the upper end with a string and at the lower end it opens into a container of wet sawdust. The xeroeclector is suspended at the point where the air flows. The drying of the sieve forces the insect to leave the dried sieve and at the same time it is attracted into the container of moist sawdust, which is removed 1 time every 12 to 24 hours. The sawdust is also remoistened at the same interval. There are a number of xeroelectrode designs. One such typical design is shown in the figure.
| Video guide: Xeroeclector |

While the xeroeclector exploits the tendency of insects to reside in slightly moist environments, the photoeclector exploits the affinity of insects for light. The millet encloses itself in a light-tight compartment that opens into a collection bottle that is in the brightest possible light. The light-seeking insect travels from the sieve into this container, where it is collected. The photoeclector is particularly useful when processing material obtained by shear or cellar. With insects from the sieve, the photoeclector has a much lower selection efficiency.
If we still want to process the slurry with a photoeclector, it is preferable to use a combined device called a photoxeroeclector. This is a combination of a xeroeclector and a photoeclector. The device designed by Dr. Jaroslav Rambousek is often mentioned in this context (see picture).

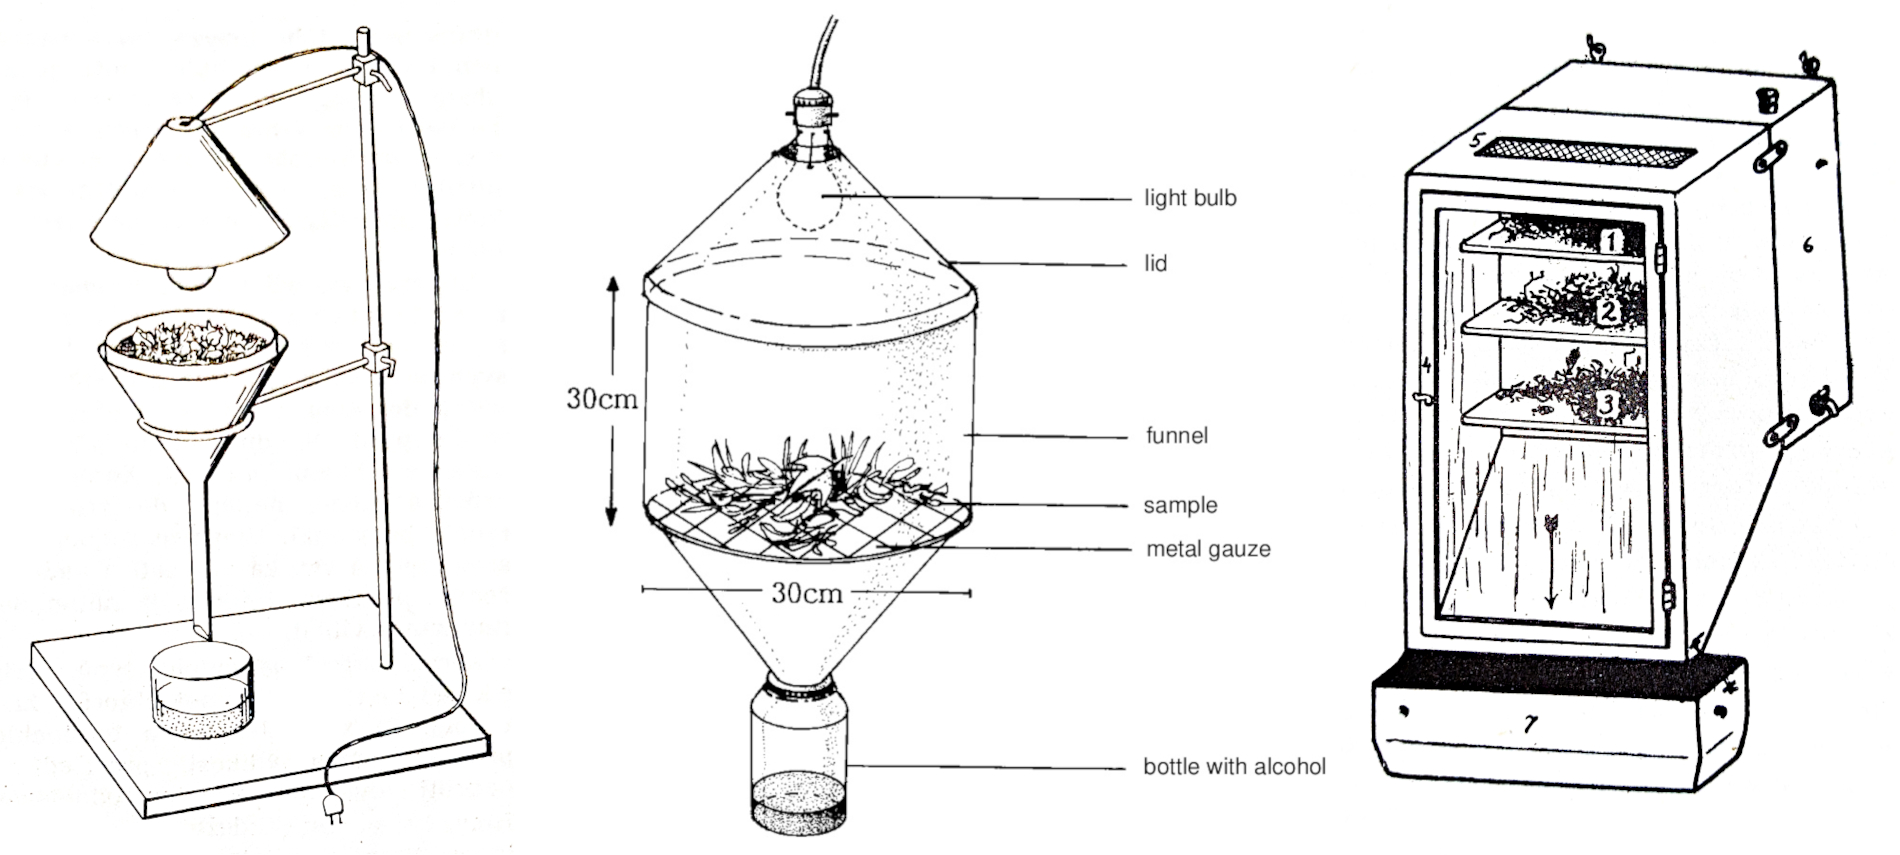 The last type of apparatus for processing the seepage is the thermoeclector. This apparatus is based on the same principle as the xeroeclector, with the difference that the drying of the seepage is not spontaneous (by free-flowing air) but forced. The forced drying of the slip is ensured by heating it, which is carried out in various ways (electrically, heat exchanger, bulb, ...). Again, we can say that there are dozens of different designs of thermoeclectors. An example of one typical design can be seen in the illustration.
Tree Bark Net

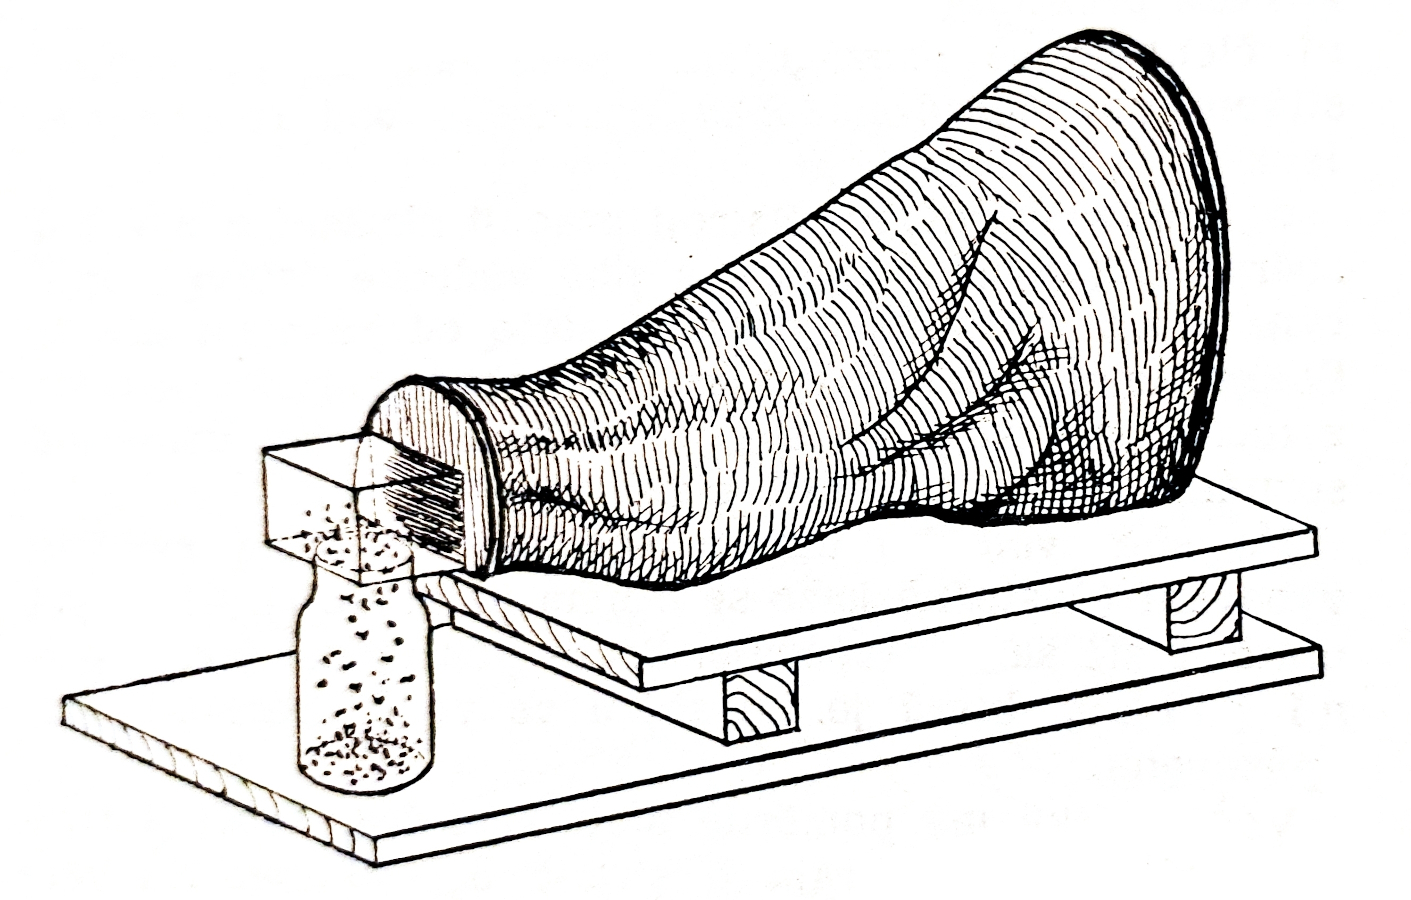
 Beetles whose life is linked to the bark of trees are caught using a tool called the Tree bark net or U-Type Insect Net. This net consists of a rigid hemispherical frame about 35 cm in diameter, the ends of which are connected by a flexible material such as rubber cord. On this frame is attached a net made of strong canvas about 40 cm long. The frame is fitted with a sturdy handle. The appearance of the net is shown in the picture.
To catch the bark beetle, press the net lightly against the tree trunk (the rubber cord hugs the trunk) and use a brush or broom to sweep the insects from the bark into the net. Follow the same procedure to check the detached bark of a dead tree. You then remove the insects from the netting with tweezers or an exhaustor, or process the bark netting material with an extractor.

Tools for passive collection methods
Passive methods of collecting crawling beetles include mainly pitfall and tree traps. Both types of traps can also be deployed as live traps, i.e. without fixative fluid. Furthermore, these traps differ according to the attractant used and, for traps that are not live traps, according to the fixing fluid used. If we have the possibility to check the traps frequently (max. 1 time in 48 hours), we prefer the live traps.
Pitfall traps
 Pitfall traps are mainly used for ground crawling beetles. The design is always a container of some kind, buried up to the neck in the ground. The containers used are usually plastic and very often plastic drink cups are used for this purpose. I recommend using 500 ml cups, always with 2 cups pushed together. This will greatly facilitate the operation of checking and regularly selecting traps. Then, when checking, simply slide out the inner cup, transfer the contents to the transport container, recover the trap and fixing fluid and reinsert the cup back into its original place. If smaller crucibles (200 - 300 ml) are used, this is in most cases when setting earth traps in soft substrate (e.g. sand), in which case a larger number of traps are set. In addition to the crucibles themselves, the placement of the attractant is also important in earth traps so that it cannot devalue the trapped individuals, the placement of a protective net to protect smaller animals that might fall into the trap, and finally the appropriate camouflage of the trap to protect against unwanted handling of the trap (whether by humans or larger game).
For ground traps we need to set the following parameters:
- number and placement of traps
- the choice of attractant
- selection of fixative fluid
The number and placement of traps affects the number of beetles caught. A larger number of traps makes it more likely that more beetles will be captured and that more species diversity will be achieved. In addition to the number of traps themselves, we can also influence the size of the catch by their placement, i.e. the choice of the distance between each trap, or their geometric arrangement.
The choice of a suitable attractant is determined by the species focus of the captured individuals. If we use animal excrement as an attractant, the traps will capture mainly coprophagous types of beetles. If we use mouse cadaver, necrophilic species will again predominate in the trap. The following is a summary of the types of attractants commonly used:
- vertebrate excrement (usually horse or cow, but also human)
- vertebrate carcasses (smaller dead species: mice, moles, hedgehogs) WARNING: definitely do not kill any vertebrate caught in the wild for traps !!! Mice sold for feeding purposes can be bought in shops.
- cheese (usually ripened and smelly)
- salami (soft types of salami are suitable)
- liver (usually chicken liver is used)
- fish (classic oil fish)
- fruit (both stone fruit and stone fruit are used, banana - fruit preferably slightly fermented)
- slightly fermented white wine (alcohol), possibly in combination with black beer or molasses
| Video guide: Pitfall trap |
The choice of fixing fluid depends on whether we want to further prepare the captured beetles. If so, we only have the choice between a saturated solution of table salt and diluted ethylene glycol. In both cases, we add a few drops of wetting agent (e.g. dishwashing liquid) to the solution to ensure a quick death even for small captured species. In these solutions, most of our trapped specimens will last a maximum of 30 days in a usable condition. After 30 days, maceration will reach such a stage that not only will the captured specimens not be easy to prepare, but identification will be difficult. I therefore recommend that checks on traps with fixing fluid should be carried out every 14 days, and for live traps we must carry out these checks once every 24, maximum 48 hours. In live traps, a layer of coarse sawdust, moss or leaves is placed in the bottom of the cup to make it easier for the trapped species to hide and prevent cannibalism of each other.
| Traps - conservation media | |||
| Preservative solution* | Material*** | Exposure time (days) |
Financial cost |
| **4% formaldehyde | hard | up to 100 (usually 20-30) | ++ (50,- CZK/l) |
| ethylene glycol | soft | max. 30 | +++ (200.- CZK/5 l) |
| salt solution | soft | max. 30 | + (10.- CZK/5 l) |
| ethanol | hard | up to 100 (usually 20 - 30) | ++++ (500.- CZK/5 l) |
| * the preservative solution must not be attractive (must not attract) **4% formaldehyde - irritant and weakly carcinogenic ***material - soft can be prepared but will decompose on prolonged exposure / hard cannot be prepared but will remain preserved |
|||
A special type of ground trap is the so-called underground trap. These are traps that are designed to catch insects that live below the surface. You will learn more about them in the chapter "Special collection methods and tools".
Tree traps
 As the name suggests, tree traps are used mainly for beetles that crawl on tree trunks and branches. They are attached to the trunks and branches of trees so that they can be easily reached by crawling beetles. They usually consist of a plastic bottle that has a cut-off top with a neck. This top part is turned and inserted into the bottom part so that the neck faces the bottom of the bottle. It actually forms a funnel that allows the beetles to enter the bottle. They will find it very difficult to find their way out. In order to allow the beetles to climb even on the smooth walls of the bottle, a thin fabric (e.g. from old women's tights) is placed on the bottle. Traps are usually attached by tying them around a log or branch. Preferably, these traps can also be used on metres of wood.
The parameters of these traps are similar to those of the ground traps. Of the usual attractants for these traps, we do not use excrements and carcasses; instead, a suitable attractant is slightly fermented wine. The attractant in these traps usually also serves as a fixative fluid. Therefore, do not forget to add a few drops of wetting agent to the solution.